Steps
Task 1: Create an Amazon VPC in a Region
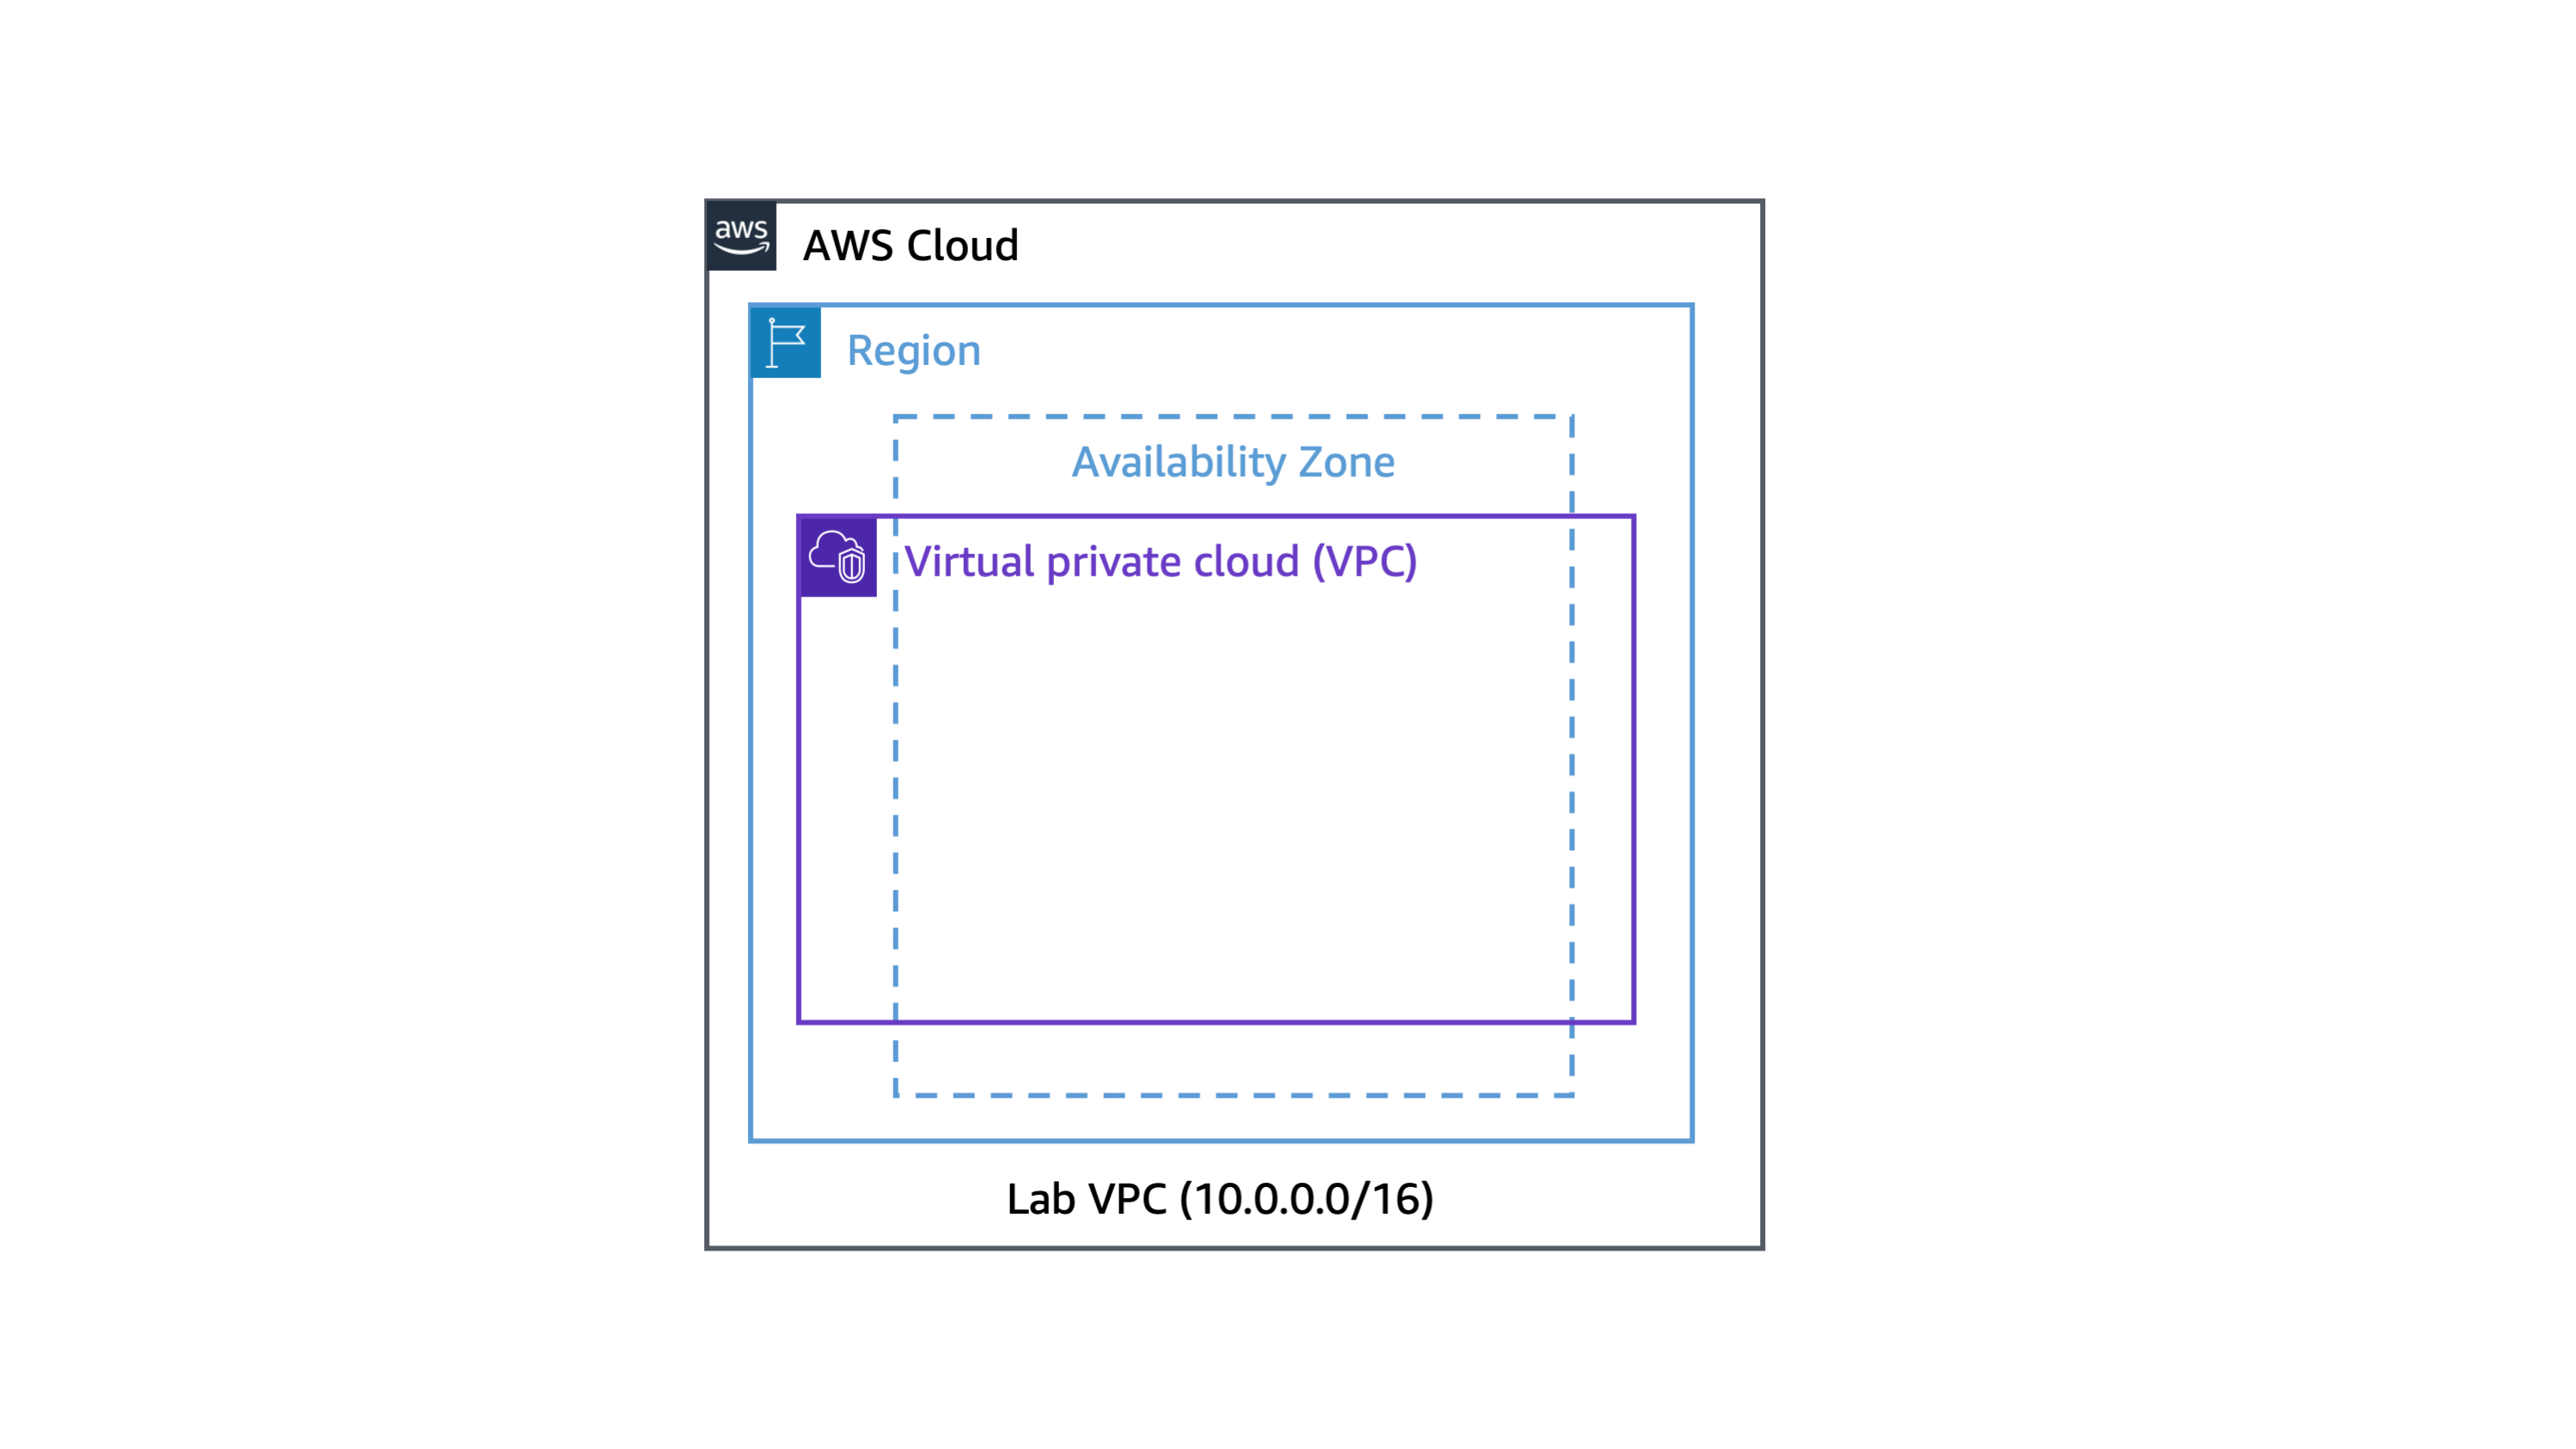
In this task, you create a new Amazon VPC in the AWS Cloud.
Learn more: With Amazon VPC, you can provision a logically isolated section of the AWS Cloud where you can launch AWS resources in a virtual network that you define. You have complete control over your virtual networking environment, including selection of your own IP address ranges, creation of subnets, and configuration of route tables and network gateways. You can also use the enhanced security options in Amazon VPC to provide more granular access to and from the Amazon EC2 instances in your virtual network.
- At the top of the AWS Management Console, in the search bar, search for and choose .
Caution: Verify that the Region displayed in the top-right corner of the console is the same as the Region value on the left side of this lab page.
Note: The VPC management console offers a VPC Wizard, which can automatically create several VPC architectures. However, in this lab you create the VPC components manually.
The console displays a list of your currently available VPCs. A default VPC is provided so that you can launch resources as soon as you start using AWS.
- Choose Create VPC and configure the following:
- Resources to create: Choose VPC only.
- Name tag - optional: Enter
- IPv4 CIDR: Enter
- Choose Create VPC.
A You successfully created vpc-xxxxxxxxxx / Lab VPC message is displayed on top of the screen.
The VPC Details page is displayed.
- Verify the state of the Lab VPC.
Expected output: It should display the following:
- State: Available
The lab VPC has a Classless Inter-Domain Routing (CIDR) range of 10.0.0.0/16, which includes all IP addresses that start with 10.0.x.x. This range contains over 65,000 addresses. You later divide the addresses into separate subnets.
- From the same page, choose Actions and choose Edit VPC settings.
The Edit VPC settings page is displayed.
- From the DNS settings section, select Enable DNS hostnames.
This option assigns a friendly Domain Name System (DNS) name to Amazon EC2 instances in the VPC, such as the following:
ec2-52-42-133-255.us-west-2.compute.amazonaws.com
- Choose Save.
A You have successfully modified the settings for vpc-xxxxxxxxxx / Lab VPC. message is displayed on top of the screen.
Any Amazon EC2 instances launched into this Amazon VPC now automatically receive a DNS hostname. You can also create a more meaningful DNS name (for example, app.company.com) using records in Amazon Route 53.
Congratulations! You have successfully created your own VPC and now you can launch the AWS resources in this defined virtual network.
Task 2: Create public subnets and private subnets
In this task, you create a public subnet and a private subnet in the lab VPC. To add a new subnet to your VPC, you must specify an IPv4 CIDR block for the subnet from the range of your VPC. You can specify the Availability Zone in which you want the subnet to reside. You can have multiple subnets in the same Availability Zone.
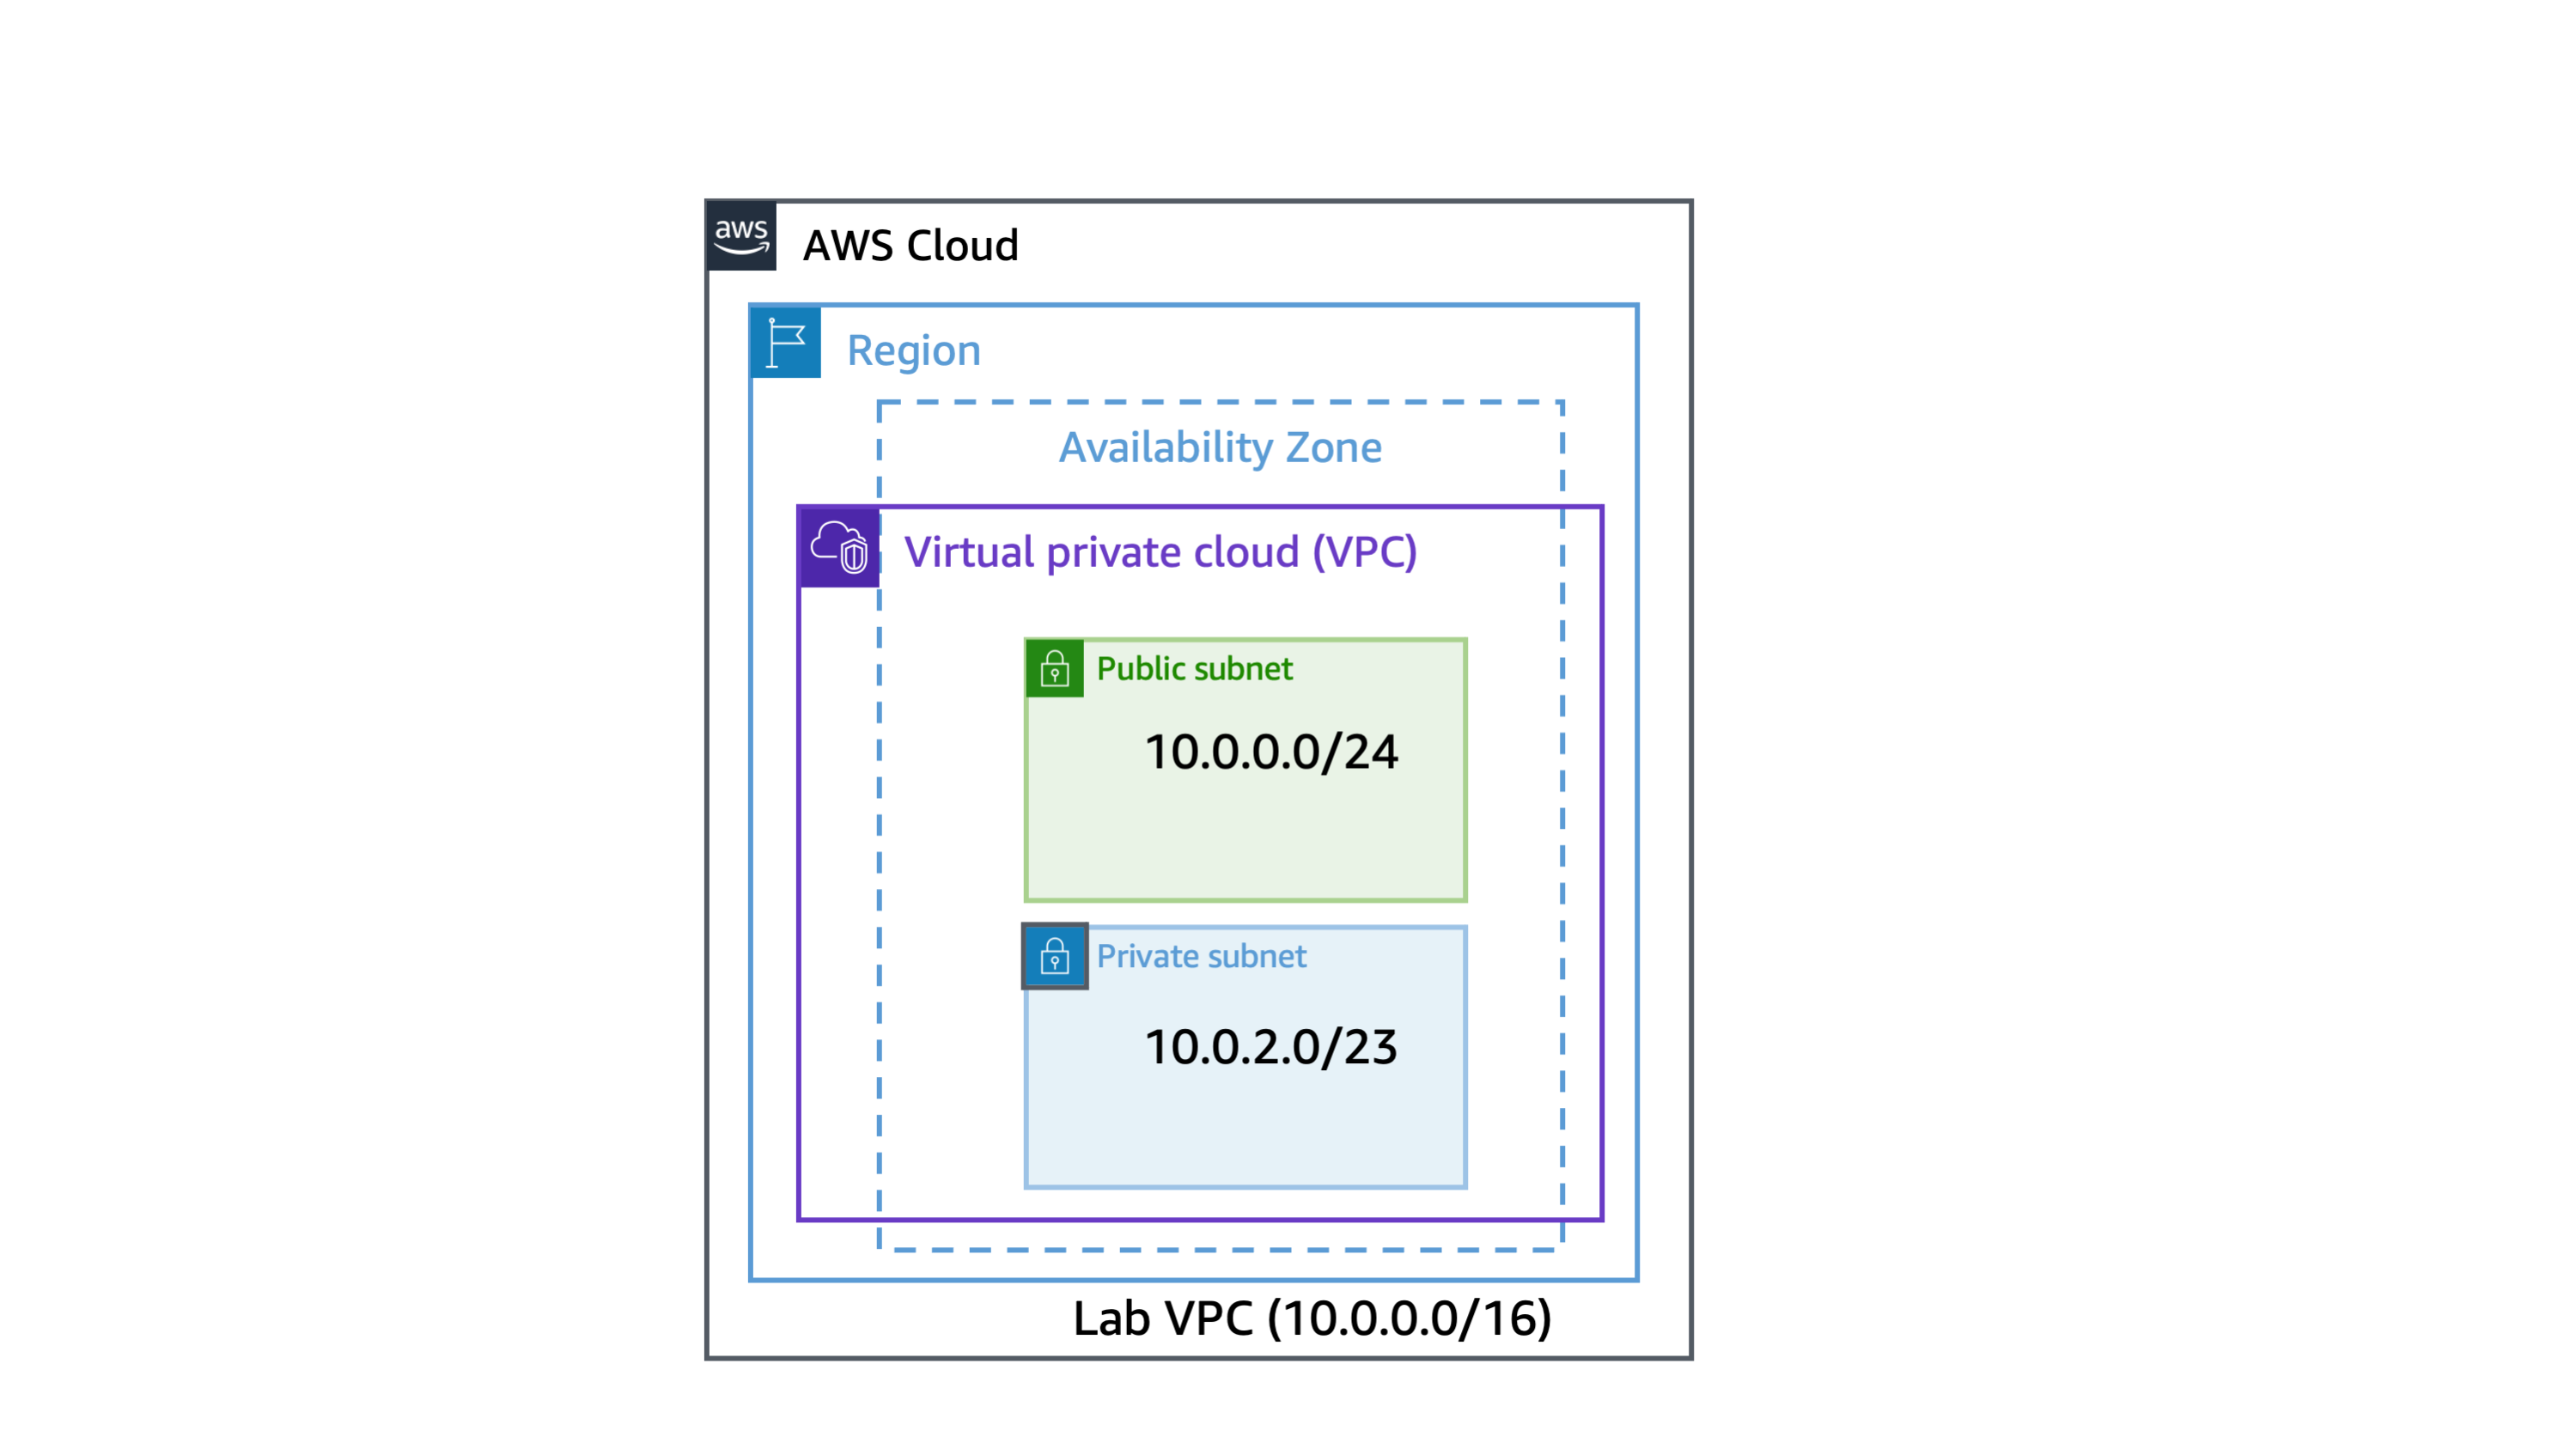
Note: A subnet is a sub-range of IP addresses within a network. You can launch AWS resources into a specified subnet. Use a public subnet for resources that must be connected to the internet, and use a private subnet for resources that are to remain isolated from the internet.
TASK 2.1: CREATE YOUR PUBLIC SUBNET
The public subnet is for internet-facing resources.
- VPC ID: Select Lab VPC from the dropdown menu.
- Subnet name: Enter .
- Availability Zone: Select the first Availability Zone in the list. (Do not choose No Preference.)
- IPv4 CIDR block: Enter .
- Choose Create subnet.
A You have successfully created 1 subnet: subnet-xxxxxx message is displayed on top of the screen.
- Verify the state.
Expected output: It should display the following:
- State: Available
Note: The VPC has a CIDR range of 10.0.0.0/16, which includes all 10.0.x.x IP addresses. The subnet you just created has a CIDR range of 10.0.0.0/24, which includes all 10.0.0.x IP addresses. These ranges might look similar, but the subnet is smaller than the VPC because of the /24 in the CIDR range.
Now, configure the subnet to automatically assign a public IP address for all instances launched within it.
-
Select Public Subnet.
-
Choose Actions and choose Edit subnet settings.
The Edit subnet settings page is displayed.
-
From the Auto-assign IP settings section, select Enable auto-assign public IPv4 address.
-
Choose Save.
A You have successfully changed subnet settings: Enable auto-assign public IPv4 address message is displayed on top of the screen.
Note: Even though this subnet is named Public Subnet, it is not yet public. A public subnet must have an internet gateway and route to the gateway. You create and attach the internet gateway and route tables in this lab.
TASK 2.2: CREATE YOUR PRIVATE SUBNET
The private subnet is for resources that are to remain isolated from the internet.
- Choose Create subnet, and then configure the following:
- VPC ID: Select Lab VPC from the dropdown menu.
- Subnet name: Enter .
- Availability Zone: Select the first Availability Zone in the list. (Do not choose No Preference.)
- IPv4 CIDR block: Enter .
- Choose Create subnet.
A You have successfully created 1 subnet: subnet-xxxxxx message is displayed on top of the screen.
- Verify the state.
Expected output: It should display the following:
- State: Available
Note: The CIDR block of 10.0.2.0/23 includes all IP addresses that start with 10.0.2.x and 10.0.3.x. This is twice as large as the public subnet because most resources should be kept private, unless they specifically need to be accessible from the internet.
Your VPC now has two subnets. However, these subnets are isolated and cannot communicate with resources outside the VPC. Next, you configure the public subnet to connect to the internet through an internet gateway.
Congratulations! You have successfully created a public subnet and a private subnet in the lab VPC.
Task 3: Create an internet gateway
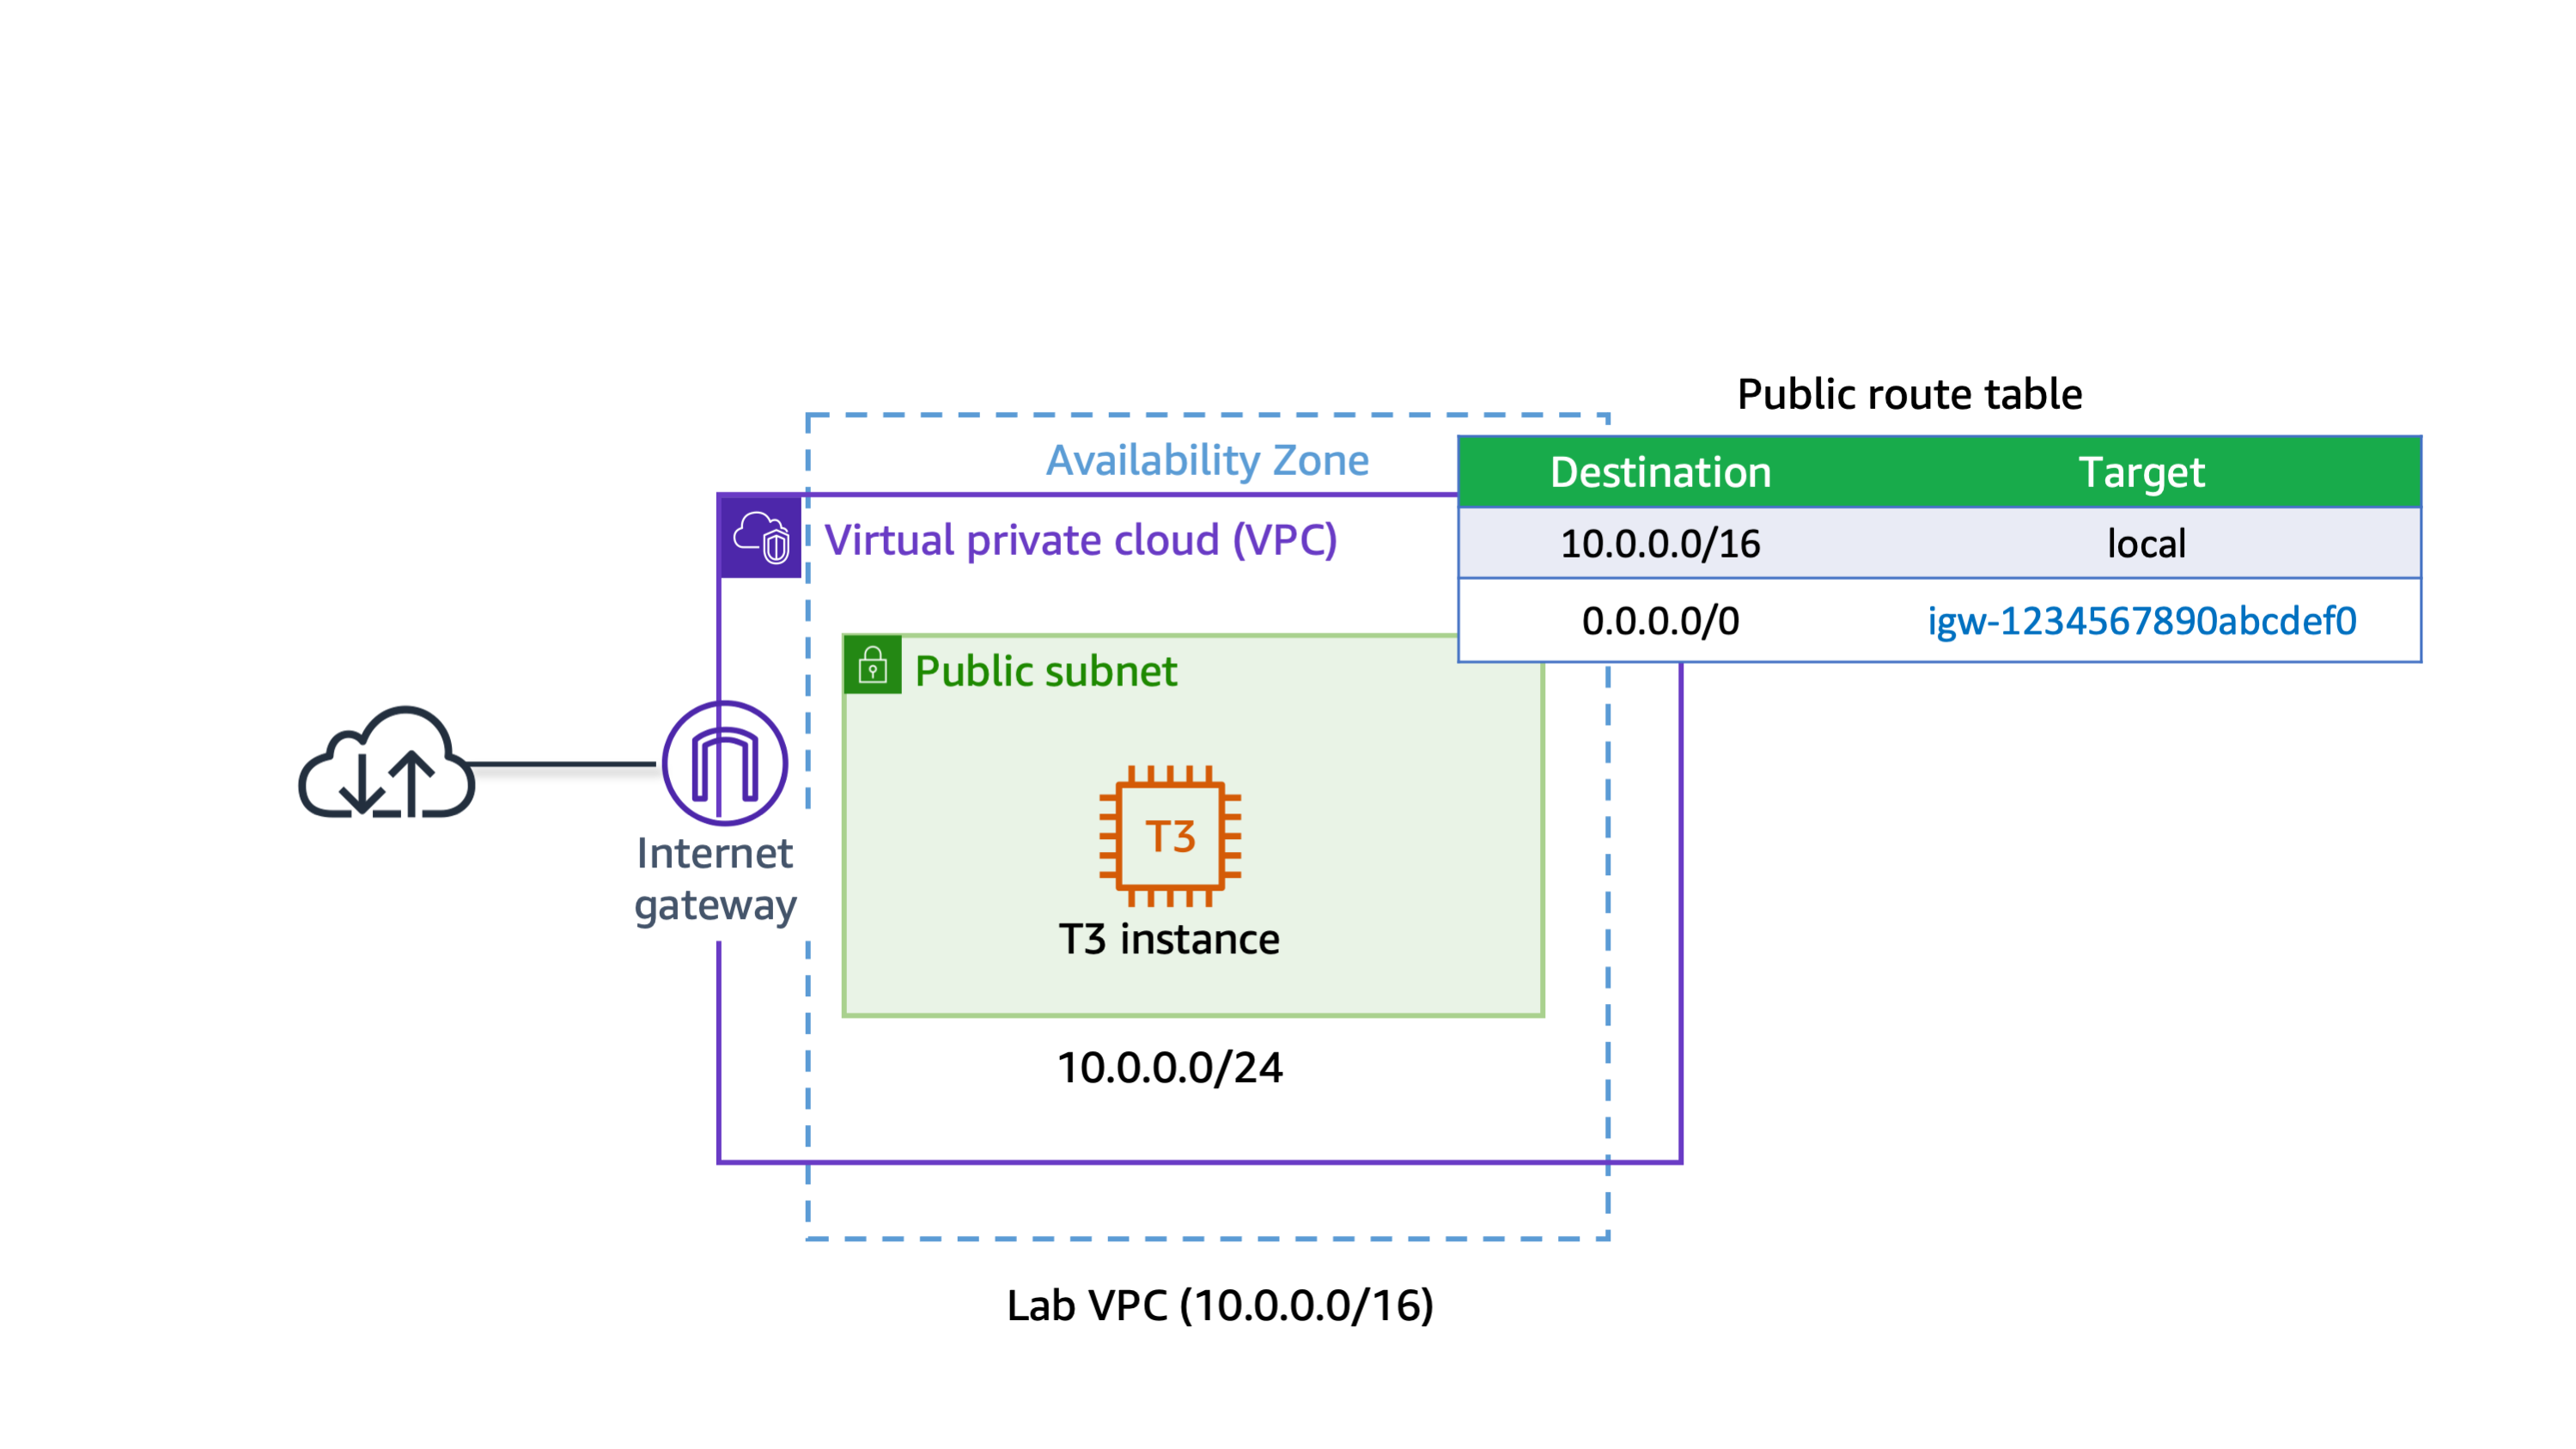
In this task, you create an internet gateway so that internet traffic can access the public subnet. To grant access to or from the internet for instances in a subnet in a VPC, you create an internet gateway and attach it to your VPC. Then you add a route to your subnet’s route table that directs internet-bound traffic to the internet gateway.
Learn more: An internet gateway serves two purposes: To provide a target in your VPC route tables for internet-bound traffic, and to perform network address translation (NAT) for instances that have been assigned public IPv4 addresses.
- Name tag: Enter .
- Choose Create internet gateway.
A The following internet gateway was created: igw-xxxxxx - Lab IGW. You can now attach to a VPC to enable the VPC to communicate with the internet. message is displayed on top of the screen.
You can now attach the internet gateway to your Lab VPC.
-
From the same page, choose Actions and choose Attach to VPC.
-
For Available VPCs, select Lab VPC from the dropdown menu.
-
Choose Attach internet gateway.
A Internet gateway igw-xxxxx successfully attached to vpc-xxxxx message is displayed on top of the screen.
- Verify the state.
Expected output: It should display the following:
- State: Attached
The internet gateway is now attached to your Lab VPC. Even though you have created an internet gateway and attached it to your VPC, you must also configure the route table of the public subnet to use the internet gateway.
Congratulations! You have successfully created an internet gateway so that internet traffic can access the public subnet.
Task 4: Route internet traffic in the public subnet to the internet gateway
In this task, you create a route table and add a route to the route table to direct internet-bound traffic to your internet gateway and associate your public subnets with your route table. Each subnet in your VPC must be associated with a route table; the table controls the routing for the subnet. A subnet can only be associated with one route table at a time, but you can associate multiple subnets with the same route table.
Learn more: A route table contains a set of rules, called routes, that are used to determine where network traffic is directed. To use an internet gateway, your subnet’s route table must contain a route that directs internet-bound traffic to the internet gateway. You can scope the route to all destinations not explicitly known to the route table (0.0.0.0/0 for IPv4 or ::/0 for IPv6), or you can scope the route to a narrower range of IP addresses. If your subnet is associated with a route table that has a route to an internet gateway, it’s known as a public subnet.
There is currently one default route table associated with the VPC, Lab VPC. This routes traffic locally. You now create an additional route table to route public traffic to your internet gateway.
- Choose Create route table, and then configure the following:
-
Name - optional: Enter .
-
VPC: Select Lab VPC from the dropdown menu.
- Choose Create route table.
A Route table rtb-xxxxxxx | Public Route Table was created successfully. message is displayed on top of the screen.
- Choose the Routes tab in the lower half of the page.
Note: There is one route in your route table that allows traffic within the 10.0.0.0/16 network to flow within the network, but it does not route traffic outside of the network.
You now add a new route to permit public traffic.
- Choose Edit routes.
- Choose Add route, and then configure the following:
- Destination: Enter .
- Target: Choose Internet Gateway in the dropdown menu, and then choose the displayed internet gateway ID.
- Choose Save changes.
A Updated routes for rtb-xxxxxxx / Public Route Table successfully message is displayed on top of the screen.
- Choose the Subnet associations tab.
- Choose Edit subnet associations.
- Select Public Subnet
- Choose Save associations.
A You have successfully updated subnet associations for rtb-xxxxxxx / Public Route Table. message is displayed on top of the screen.
Note: The subnet is now public because it has a route to the internet through the internet gateway.
Congratulations! You have successfully configured the route table.
Task 5: Create a public security group
In this task, you create a security group so that users can access your Amazon EC2 instance. Security groups in a VPC specify which traffic is allowed to or from an Amazon EC2 instance.
Learn more: You can use Amazon EC2 security groups to help secure instances within an Amazon VPC. By using security groups in a VPC, you can specify both inbound and outbound network traffic that is allowed to or from each Amazon EC2 instance. Traffic that is not explicitly allowed to or from an instance is automatically denied.
Security: It is recommended to use HTTPS protocol to improve web traffic security. However, to simplify this lab, only HTTP protocol is used.
- Security group name: Enter .
- Description: Enter .
- VPC: Select Lab VPC from the dropdown menu.
- In the Inbound rules section, choose Add rule and configure the following:
- Type: Select HTTP from the dropdown menu.
- Source: Select Anywhere-IPv4 from the dropdown menu.
- Key: Enter .
- Value: Enter .
- Choose Create security group.
A Security group (sg-xxxxxxx | Public SG) was created successfully message is displayed on top of the screen.
Congratulations! You have successfully created a security group that allows HTTP traffic. You need this in the next task when you launch an Amazon EC2 instance in the public subnet.
Task 6: Launch an Amazon EC2 instance into a public subnet
In this task, you launch an Amazon EC2 instance into a public subnet. To activate communication over the internet for IPv4, your instance must have a public IPv4 address that’s associated with a private IPv4 address on your instance. By default, your instance is only aware of the private (internal) IP address space defined within the VPC and subnet.
Learn more: The internet gateway that you created logically provides the one-to-one NAT on behalf of your instance. So when traffic leaves your VPC subnet and goes to the internet, the reply address field is set to the public IPv4 address or Elastic IP address of your instance, and not its private IP address.
- At the top of the AWS Management Console, in the search bar, search for and choose .
The Amazon EC2 Management Console is displayed.
TASK 6.1: BEGIN THE INSTANCE CONFIGURATION
The Launch an instance page is displayed.
TASK 6.2: ADD TAGS TO THE INSTANCE
In this task, you add a tag to the Amazon EC2 instance.
- Locate the Name and tags section.
- In the Name field, enter .
Note: No additional instance tags are required for this lab.
TASK 6.3: SELECT AN AMI
In this task, you choose an Amazon Machine Image (AMI). The AMI contains a copy of the disk volume used to launch the instance.
- Locate the Application and OS Images (Amazon Machine Image) section.
- Ensure that Amazon Linux is selected as the OS.
- Ensure that Amazon Linux 2023 AMI is selected in the dropdown menu.
TASK 6.4: CHOOSE THE AMAZON EC2 INSTANCE TYPE
Each instance type allocates a specific combination of virtual CPUs (vCPUs), memory, disk storage, and network performance.
For this lab, use a t3.micro instance type. This instance type has 2 vCPUs and 1 GiB of memory.
- Locate the Instance type section.
- From the Instance type dropdown menu, choose t3.micro.
TASK 6.5: CONFIGURE KEY PAIR FOR LOGIN
- Locate the Key pair (login) section.
- From the Key pair name - required dropdown menu, choose Proceed without a key pair (Not recommended) .
TASK 6.6: CONFIGURE INSTANCE NETWORKING
- Locate the Network settings section.
- Choose Edit.
- Configure the following settings from the dropdown menus:
- VPC - required: Select Lab VPC.
- Subnet: Select Public Subnet.
- Auto-assign public IP: Select Enable.
TASK 6.7: CONFIGURE INSTANCE SECURITY GROUPS
You can use security groups to define both the allowed/denied and the inbound/outbound traffic for the elastic network interface. The network interface is attached to an Amazon EC2 instance. Port 80 is the default port for HTTP traffic, and it is necessary for the web server you launch in this lab to work correctly.
- For Firewall (security groups), choose Select existing security group.
- From the Common security groups dropdown menu, choose the security group that has a name like Public SG.
TASK 6.8: ADD STORAGE
You can use the Configure storage section to specify or modify the storage options for the instance and add additional Amazon Elastic Block Store (Amazon EBS) disk volumes attached to the instance. The EBS volumes can be configured in both their size and performance.
In this lab, the default storage settings are all that is needed. No changes are required.
TASK 6.9: CONFIGURE USER DATA
- Locate and expand the Advanced details section.
- From the IAM instance profile dropdown menu, select the role that has a name like EC2InstProfile.
Note: To install and configure the new instance as a web server, you provide a user data script that automatically runs when the instance launches.
- In the User data - optional section, copy and paste the following:
#!/bin/bash
# To connect to your EC2 instance and install the Apache web server with PHP
yum update -y
yum install -y httpd php8.1
systemctl enable httpd.service
systemctl start httpd
cd /var/www/html
wget  https://us-west-2-tcprod.s3.amazonaws.com/courses/ILT-TF-200-ARCHIT/v7.7.1.prod-ac6a334e/lab-2-VPC/scripts/instanceData.zip
unzip instanceData.zip
The remaining settings on the page can be left at their default values.
TASK 6.10: REVIEW THE INSTANCE LAUNCH
Take a moment to review that the configuration for the Amazon EC2 instance you are about to launch is correct.
- Locate the Summary section.
- Choose Launch instance.
The Launch an instance page is displayed.
Your Amazon EC2 instance is now launched and configured as you specified.
- Choose View all instances.
The Amazon EC2 console is displayed.
- Occasionally choose the console refresh button and wait for Public Instance to display the Instance state as Running and wait for Status check to pass 2/2 checks passed.
Note: The Amazon EC2 instance named Public Instance is initially in a Pending state. The instance state then changes to Running indicating that the instance has finished booting.
Congratulations! You have successfully launched an Amazon EC2 instance into a public subnet.
Task 7: Connect to a public instance through HTTP
In this task, you connect to the public instance and launch the basic Apache web server page. The inbound rules added earlier that allow HTTP access (port 80) allow you to connect to the web server running Apache.
Note: If you need to make any section of the console larger, you can resize the horizontal edges of the containers displayed on the console.
- Locate the Public IPv4 DNS value.
- Copy the public DNS value. Do not choose the open address option, because HTTPS is not set up for this lab environment.
- Open a new browser tab and paste the public DNS value for Public Instance in the URL address bar.
The web page hosted on the Amazon EC2 instance is displayed. The page displays the instance ID and the AWS Availability Zone where the Amazon EC2 instance is located.
- Close the browser tab and return to the console.
Congratulations! You have successfully launched an Apache web server in the public subnet and tested the HTTP connection. You can safely close the tab and return to the console.
Task 8: Connect to the Amazon EC2 instance in the public subnet through Session Manager
In this task, you connect to your Amazon EC2 instance in the public subnet using Session Manager.
Learn more: Session Manager is a fully managed AWS Systems Manager capability that you use to manage your Amazon EC2 instances through an interactive one-click browser-based shell or through the AWS Command Line Interface (AWS CLI). You can use Session Manager to start a session with an Amazon EC2 instance in your account. After starting the session, you can run bash commands as you would through any other connection type.
-
At the top of the AWS Management Console, in the search bar, search for and choose .
-
In the left navigation pane, choose Instances.
-
Select Public Instance and choose Connect.
The Connect to instance page is displayed.
- Choose the Session Manager tab.
Learn more: With Session Manager, you can connect to Amazon EC2 instances without needing to expose the SSH port on your firewall or Amazon VPC security group. For more information, see AWS Systems Manager Session Manager.
- Choose Connect.
A new browser tab or window opens with a connection to the Public Instance.
Note: The Session Manager service is not updated in real time. If you experience errors with Session Manager connecting to an Amazon EC2 instance you just launched, ensure that you have given the instance a few minutes to launch, pass health checks, and communicate with the Session Manager service before trying to open a session connection again.
- Command: Enter the following command to change to the home directory (/home/ssm-user/) and test web connectivity using the cURL command:
cd ~
curl -I https://aws.amazon.com/training/
Expected output:
HTTP/2 200
content-type: text/html;charset=UTF-8
server: Server
date: Wed, 19 Apr 2023 14:43:47 GMT
x-amz-rid: 6HVPS1JY1XW2S1K34Q3Z
set-cookie: aws-priv=eyJ2IjoxLCJldSI6MCwic3QiOjB9; Version=1; Comment="Anonymous cookie for privacy regulations"; Domain=.aws.amazon.com; Max-Age=31536000; Expires=Thu, 18-Apr-2024 14:43:47 GMT; Path=/; Secure
set-cookie: aws_lang=en; Domain=.amazon.com; Path=/
x-frame-options: SAMEORIGIN
x-xss-protection: 1; mode=block
strict-transport-security: max-age=63072000
x-content-type-options: nosniff
x-amz-id-1: 6HVPS1JY1XW2S1K34Q3Z
last-modified: Thu, 30 Mar 2023 15:58:02 GMT
content-security-policy-report-only: default-src *; connect-src *; font-src * data:; frame-src *; img-src * data:; media-src *; object-src *; script-src *; style-src 'unsafe-inline' *; report-uri https://prod-us-west-2.csp-report.marketing.aws.dev/submit
vary: accept-encoding,Content-Type,Accept-Encoding,User-Agent
x-cache: Miss from cloudfront
via: 1.1 88c333921d5c405e037b84bb8c2dc33e.cloudfront.net (CloudFront)
x-amz-cf-pop: GRU3-P1
x-amz-cf-id: 89R1wtM9vYV0kIQXrEVkcoNzg_C3UfQJIEVkC5BA3xiIH3FD0nVnYw==
Congratulations! You have successfully connected to your public instance using Session Manager. You can safely close the tab and return to the console.
Task 9: Create a NAT gateway and configuring routing in the private subnet
In this task, you create a NAT gateway and then create a route table to route non-local traffic to the NAT gateway. You then attach the route table to the private subnet. You can use a NAT gateway to allow instances in a private subnet to connect to the internet or other AWS services, but prevent the internet from initiating a connection with those instances.
Note: To create a NAT gateway, you must specify the public subnet in which the NAT gateway should reside. You must also specify an Elastic IP address to associate with the NAT gateway when you create it. You cannot change the Elastic IP address after you associate it with the NAT gateway. After you’ve created a NAT gateway, you must update the route table associated with one or more of your private subnets to point internet-bound traffic to the NAT gateway. This allows instances in your private subnets to communicate with the internet.
-
Return to the AWS Management Console browser tab.
-
At the top of the AWS Management Console, in the search box, search for and choose .
-
In the left navigation pane, choose NAT gateways.
-
Choose Create NAT gateway and configure the following:
- Name - optional: Enter .
- Subnet: Select Public Subnet from the dropdown menu.
- For Elastic IP allocation ID, choose Allocate Elastic IP.
- Choose Create NAT gateway.
A NAT gateway nat-xxxxxxx | Lab NGW was created successfully. message is displayed on top of the screen.
In the next step, you create a new route table for a private subnet that redirects non-local traffic to the NAT gateway.
- Name - optional: Enter .
- VPC: Select Lab VPC from the dropdown menu.
- Choose Create route table.
A Route table rtb-xxxxxxx | Private Route Table was created successfully. message is displayed on top of the screen.
The private route table is created and the details page for the private route table is displayed.
- Choose the Routes tab.
There is currently one route that directs all traffic locally.
You now add a route to send internet-bound traffic through the NAT gateway.
-
Choose Edit routes.
-
Choose Add route and then configure the following:
- Destination: Enter .
- Target: Choose NAT Gateway in the dropdown menu, and then choose the displayed NAT Gateway ID.
- Choose Save changes.
A Updated routes for rtb-xxxxxxx / Private Route Table successfully message is displayed on top of the screen.
- Choose the Subnet associations tab.
- Choose Edit subnet associations.
- Select Private Subnet.
- Choose Save associations.
A You have successfully updated subnet associations for rtb-xxxxxxx / Private Route Table. message is displayed on top of the screen.
This route sends internet-bound traffic from the private subnet to the NAT gateway that is in the same Availability Zone.
Congratulations! You have successfully created the NAT gateway and configured the private route table.
Task 10: Create a security group for private resources
In this task, you create a security group that allows incoming HTTP traffic from resources assigned to the public security group. In a multi-tiered architecture, resources in a private subnet are should not directly accessible from the internet, however their is a common use case to route web traffic from publicly accessible resources to private resources.
Learn more: When you specify a security group as the source for a rule, traffic is allowed from the network interfaces that are associated with the source security group for the specified port and protocol. Incoming traffic is allowed based on the private IP addresses of the network interfaces that are associated with the source security group (and not the public IP or Elastic IP addresses). Adding a security group as a source does not add rules from the source security group.
- Security group name: Enter .
- Description: Enter .
- VPC: Select Lab VPC from the dropdown menu.
- In the Inbound rules section, choose Add rule and configure the following:
- Type: Select HTTP.
- Source: Select Custom.
- In the box to the right of Custom, type .
- Choose Public SG from the list.
- Key: Enter .
- Value: Enter .
- Choose Create security group.
A Security group (sg-xxxxxxx | Private SG) was created successfully message is displayed on top of the screen.
Congratulations! You have successfully created the private security group.
Task 11: Launch an Amazon EC2 instance into a private subnet
In this task, you launch an Amazon EC2 instance into a private subnet.
Learn more: Private instances can route their traffic through a NAT gateway or a NAT instance to access the internet. Private instances use the public IP address of the NAT gateway or NAT instance to traverse the internet. The NAT gateway or NAT instance allows outbound communication but doesn’t allow machines on the internet to initiate a connection to the privately addressed instances.
- At the top of the AWS Management Console, in the search bar, search for and choose .
The Amazon EC2 console is displayed.
TASK 11.1: BEGIN THE INSTANCE CONFIGURATION
- Choose EC2 Dashboard from the console navigation menu on the left.
- Choose Launch instance from the Launch instance section.
The Launch an instance page is displayed. In this task, you add a tag to the Amazon EC2 instance.
- Locate the Name and tags section.
- Enter in the Name field.
Note: No additional instance tags are required for this lab.
TASK 11.3: SELECT AN AMI
In this task, you choose an AMI. The AMI contains a copy of the disk volume used to launch the instance.
- Locate the Application and OS Images (Amazon Machine Image) section.
- Ensure that Amazon Linux is selected as the OS.
- Ensure that Amazon Linux 2023 AMI is selected in the dropdown menu.
TASK 11.4: CHOOSE THE AMAZON EC2 INSTANCE TYPE
Each instance type allocates a specific combination of vCPUs, memory, disk storage, and network performance.
For this lab, use a t3.micro instance type. This instance type has 2 vCPUs and 1 GiB of memory.
- Locate the Instance type section.
- Choose t3.micro from the Instance type dropdown menu.
TASK 11.5: CONFIGURE KEY PAIR FOR LOGIN
- Locate the Key pair (login) section.
- Choose Proceed without a key pair (Not recommended) from the Key pair name - required dropdown menu.
TASK 11.6: CONFIGURE INSTANCE NETWORKING
- Locate the Network settings section.
- Choose Edit and configure the following settings from the dropdown menus:
- VPC - required: Select Lab VPC.
- Subnet: Select Private Subnet.
- Auto-assign public IP: Select Disable.
TASK 11.7: CONFIGURE INSTANCE SECURITY GROUPS
- For Firewall (security groups), choose Select existing security group
- Choose the security group that has a name like Private SG from the Common security groups dropdown menu.
TASK 11.8: ADD STORAGE
You can use the Configure storage section to specify or modify the storage options for the instance and add additional Amazon Elastic Block Store (Amazon EBS) disk volumes attached to the instance. The EBS volumes can be configured in both their size and performance.
In this lab, the default storage settings are all that is needed. No changes are required.
TASK 11.9: CONFIGURE THE IAM INSTANCE PROFILE
- Locate and expand the Advanced details section.
- Choose the EC2InstProfile role from the IAM instance profile dropdown menu.
The remaining settings on the page can be left at their default values.
TASK 11.10: CONFIGURE USER DATA
- Locate and expand the Advanced details section.
- From the IAM instance profile dropdown menu, select the role that has a name like EC2InstProfile.
Note: To install and configure the new instance as a web server, you provide a user data script that automatically runs when the instance launches.
- In the User data - optional section, copy and paste the following:
#!/bin/bash
# To connect to your EC2 instance and install the Apache web server with PHP
yum update -y
yum install -y httpd php8.1
systemctl enable httpd.service
systemctl start httpd
cd /var/www/html
wget  https://us-west-2-tcprod.s3.amazonaws.com/courses/ILT-TF-200-ARCHIT/v7.7.1.prod-ac6a334e/lab-2-VPC/scripts/instanceData.zip
unzip instanceData.zip
The remaining settings on the page can be left at their default values.
TASK 11.11: REVIEW THE INSTANCE LAUNCH
Take a moment to review that the configuration for the Amazon EC2 instance you are about to launch is correct.
- Locate the Summary section.
- Choose Launch instance.
The Launch an instance page is displayed.
Your Amazon EC2 instance is now launched and configured as you specified.
- Choose View all instances.
The Amazon EC2 console is displayed.
The Amazon EC2 instance name Private Instance is initially in a Pending state. The state then changes to Running, indicating that the instance has finished booting.
- Occasionally choose the console refresh button and wait for the Instance state to change to Running.
Congratulations! You have successfully launched an Amazon EC2 instance into a private subnet.
Task 12: Connect to the Amazon EC2 instance in the private subnet
In this task, you connect to the Amazon EC2 instance in the private subnet using Session Manager.
The Connect to instance page is displayed.
- Choose the Session Manager tab.
- Choose Connect.
A new browser tab or window opens with a connection to the Private Instance.
Note: The Session Manager service is not updated in real time. If you experience errors with Session Manager connecting to an Amazon EC2 instance you just launched, ensure that you have given the instance a few minutes to launch, pass health checks, and communicate with the Session Manager service before trying to open a session connection again.
- Command: Enter the following command to change to the home directory (/home/ssm-user/) and test web connectivity using the cURL command:
cd ~
curl -I https://aws.amazon.com/training/
Expected output:
HTTP/2 200
content-type: text/html;charset=UTF-8
server: Server
date: Wed, 19 Apr 2023 14:59:09 GMT
x-amz-rid: AZPXJ57K93ERATZV588Z
set-cookie: aws-priv=eyJ2IjoxLCJldSI6MCwic3QiOjB9; Version=1; Comment="Anonymous cookie for privacy regulations"; Domain=.aws.amazon.com; Max-Age=31536000; Expires=Thu, 18-Apr-2024 14:59:08 GMT; Path=/; Secure
set-cookie: aws_lang=en; Domain=.amazon.com; Path=/
x-frame-options: SAMEORIGIN
x-xss-protection: 1; mode=block
strict-transport-security: max-age=63072000
x-content-type-options: nosniff
x-amz-id-1: AZPXJ57K93ERATZV588Z
last-modified: Thu, 30 Mar 2023 15:58:02 GMT
content-security-policy-report-only: default-src *; connect-src *; font-src * data:; frame-src *; img-src * data:; media-src *; object-src *; script-src *; style-src 'unsafe-inline' *; report-uri https://prod-us-west-2.csp-report.marketing.aws.dev/submit
vary: accept-encoding,Content-Type,Accept-Encoding,User-Agent
x-cache: Miss from cloudfront
via: 1.1 fb6a4eca9caced7b791557c24b8c6606.cloudfront.net (CloudFront)
x-amz-cf-pop: GRU3-P1
x-amz-cf-id: Tjphb1UhSXmtyHvybuq4QIFwzTurEI0g_saLB2nLjlYRiBbHbqn85Q==
- Close the Session Manager tab and return to the console.
Congratulations! You have successfully connected to a private instance using Session Manager.