Steps
Task 1: Create an Amazon RDS database
In this task, you create an Aurora DB cluster that is compatible with MySQL. An Aurora DB cluster consists of one or more DB instances and a cluster volume that manages the data for those DB instances.
Learn more: Amazon Aurora is a fully managed relational database engine that is compatible with MySQL and PostgreSQL. Aurora is part of the managed database service, Amazon RDS. Amazon RDS is a web service that makes it easier to set up, operate, and scale a relational database in the cloud. For more information, see What is Amazon Aurora?.
-
At the top of the AWS Management Console, in the search bar, search for and choose .
-
In the left navigation pane, choose Databases.
-
Choose Create database.
The Create database page is displayed.
-
In the Choose a database creation method section, select Standard create.
-
In the Engine options section, configure the following:
- Engine type: Select Aurora (MySQL Compatible).
-
In the Templates section, select Dev/Test.
-
In the Settings section, configure the following:
- DB cluster identifier: Enter .
- Master username: Enter .
- Master password: Paste the LabPassword value from the left side of these lab instructions.
- Confirm master password: Paste the LabPassword value from the left side of these lab instructions.
- In the Instance configuration section, configure the following:
- DB instance class: Select Burstable classes (includes t classes).
- From the dropdown menu, choose the db.t3.medium instance type.
- In the Availability & durability section, for Multi-AZ deployment, select Don’t create an Aurora Replica.
Learn more: Amazon RDS Multi-AZ deployments provide enhanced availability and durability for DB instances, making them a natural fit for production database workloads. When you provision a Multi-AZ DB instance, Amazon RDS automatically creates a primary DB instance and synchronously replicates the data to a standby instance in a different Availability Zone. For more information, see Amazon RDS Multi-AZ.
Note: Since this lab is about knowing the resources required to build a multi-tier architecture, you do not need to perform a Multi-AZ deployment. You learn how to deploy a Multi-AZ architecture in the next lab.
- In the Connectivity section, configure the following:
- Virtual private cloud (VPC): Select LabVPC from the dropdown menu.
- DB subnet group: Select labdbsubnetgroup from the dropdown menu.
- Public access: Select No.
- VPC security group (firewall): Select Choose existing.
- Existing VPC security groups:
- To remove the default security group from the Existing VPC security groups field, select the X.
- In the Existing VPC security groups dropdown menu, enter to choose this option.
Learn more: Subnets are segments of an IP address range in an Amazon VPC that you designate to group your resources based on security and operational needs. A DB subnet group is a collection of subnets (typically private) that you create in an Amazon VPC and then designate for your DB instances. With a DB subnet group, you can specify an Amazon VPC when creating DB instances using the command line interface or API. If you use the console, you can just select the Amazon VPC and subnets you want to use. For more information, see Working with DB subnet groups.
Learn more: With Amazon VPC, you can launch AWS resources into a virtual network that you have defined. This virtual network closely resembles a traditional network that you would operate in your own data center, with the benefits of using the scalable infrastructure of AWS. For more information, see Amazon VPC VPCs and Amazon RDS.
-
In the Monitoring section, de-select Enable Enhanced monitoring
-
Expand the Additional configuration main section at the end of the page.
-
In the Database options section, configure the following:
- Initial database name: Enter
- DB cluster parameter group: Choose the value from the dropdown menu that matches the DBClusterParameterGroup value from the left side of this page.
Caution: Ensure the correct value for DB cluster parameter group is selected from the dropdown menu. An incorrect value results in errors when building the database replicas.
- In the Encryption section, unselect Enable encryption.
Learn more: You can encrypt your Amazon RDS instances and snapshots at rest by activating the encryption option for your Amazon RDS DB instance. Data that is encrypted at rest includes the underlying storage for a DB instance, its automated backups, read replicas, and snapshots. For more information, see Encrypting Amazon RDS resources.
- In the Maintenance section, unselect Enable auto minor version upgrade.
Note: Because the nature of this lab is short lived there is no need to set up a maintenance schedule for the database.
-
Scroll to the bottom of the screen, then choose Create database.
-
On the Suggested add-ons for aurora pop-up window, choose Close.
A Successfully created database aurora message is displayed on top of the screen.
Your Aurora MySQL DB cluster is in the process of launching. The Amazon RDS database can take up to 5 minutes to launch. However, you can continue to the next task.
Congratulations! You have successfully created an Amazon RDS database.
Task 2: Create and configure an Application Load Balancer
In this task, you create an Application Load Balancer in the public subnets to access the application from a browser. You navigate to the Amazon EC2 console and create an Application Load Balancer into the existing Amazon VPC infrastructure and add the private EC2 instances as a target.
A load balancer serves as the single point of contact for clients. Clients send requests to the load balancer, and the load balancer sends them to targets, such as EC2 instances. To configure your load balancer, you create target groups and then register targets with your target groups.
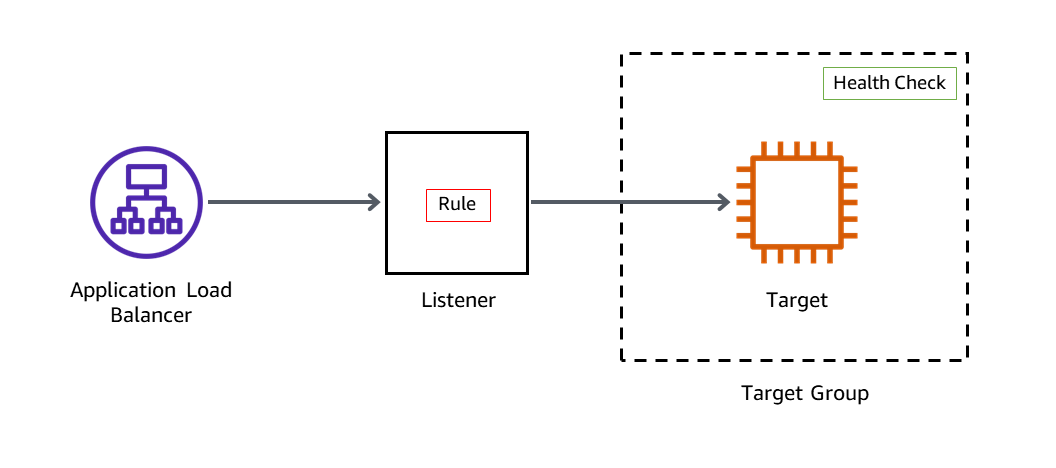
TASK 2.1 : CREATE A TARGET GROUP
In this task, you create a target group and register your targets with the target group. By default, the load balancer sends requests to registered targets using the port and protocol that you specified for the target group.
-
At the top of the console, in the search bar, search for and choose .
-
In the left navigation pane, expand the Load Balancing section and choose Target Groups.
-
Choose Create target group.
The Specify group details page is displayed.
- In the Basic configuration section, configure the following:
- Choose a target type: Select Instances.
- Target group name: Enter .
- VPC: Select LabVPC from the dropdown menu.
The remaining settings on the page can be left at their default values.
- Choose Next.
The Register targets page is displayed.
- In the Available instances section, configure the following:
- Select the EC2 instance named AppServer1 and AppServer2.
- Choose Include as pending below.
The instance appears under the Targets section of the page.
- Choose Create target group.
A Successfully created target group: ALBTargetGroup message is displayed on top of the screen.
TASK 2.2 : CREATE AN APPLICATION LOAD BALANCER
In this task, you create an Application Load Balancer. To do that, you must first provide basic configuration information for your load balancer, such as a name, scheme, and IP address type. Then, you provide information about your network and one or more listeners.
The Select load balancer type page is displayed.
- In the Load balancer types section, for Application Load Balancer card, choose Create.
The Create Application Load Balancer page is displayed.
- In the Basic configuration section, configure the following:
- Load balancer name: Enter .
- In the Network mapping section, configure the following:
- VPC: Select LabVPC from the dropdown menu.
- Mappings:
- Select the check box for the first Availability Zone listed, and select PublicSubnet1 from the Subnet list dropdown menu.
- Select the check box for the second Availability Zone listed, and select PublicSubnet2 from the Subnet list dropdown menu.
- In the Security groups section, configure the following:
- Select the X to remove the default security group.
- Select LabALBSecurityGroup from the dropdown menu.
- In the Listeners and routing section, configure the following:
- For Listener HTTP:80: From the Default action dropdown menu, select ALBTargetGroup.
- Choose Create load balancer.
A Successfully created load balancer: LabAppALB message is displayed on top of the screen.
- Choose View load balancer.
The load balancer is in the Provisioning state for few minutes and then changes to Active.
In this task, you created an Application Load Balancer and you added EC2 instances as a target to the load balancer. This task provides a demonstration on how to register a target with a load balancer. In addition to individual EC2 instances, Auto Scaling groups can also be registered as targets for the load balancer. When you use Auto Scaling groups as targets for load balancing, the instances that are launched by the Auto Scaling group are automatically registered with the load balancer. Likewise, EC2 instances that are ended by the Auto Scaling groups are automatically unregistered from the load balancer. Using Auto Scaling groups with a load balancer is demonstrated in the next lab.
Congratulations! You have successfully created a load balancer, created target groups, and registered the EC2 instances with the target group.
Task 3: Review the Amazon RDS DB instance metadata through the console
In this task, you navigate through the Amazon RDS console to ensure the instance created in Task 1 has completed and is active. You explore the console to learn how to find the connection information for a DB instance. The connection information for a DB instance includes its endpoint, port, and a valid database user.
-
At the top of the console, in the search bar, search for and choose .
-
In the navigation pane, choose Databases.
-
From the list of DB identifiers, select the hyperlink for the cluster named aurora.
A page with details about the database are displayed.
-
On the Connectivity & security tab, you can find the endpoint and port number for the database cluster. In general, you need the endpoints and the port number to connect to the database.
-
Copy and paste the Endpoint name of the writer instance value to a notepad. You need this value later in the lab.
It should look similar to aurora.cluster-crwxbgqad61a.us-west-2.rds.amazonaws.com.
Tip: To copy the writer instance endpoint, hover on it and choose the copy icon.
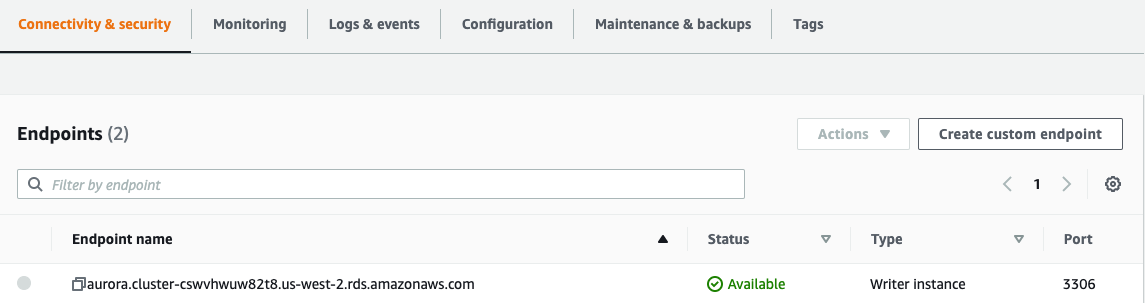
Notice that the status for the endpoints is Available.
-
On the Configuration tab, you can find details regarding how the database is currently configured.
-
On the Monitoring tab, you can monitor metrics for the following items of your database:
- The number of connections to a database instance
- The amount of read and write operations to a database instance
- The amount of storage that a database instance is currently using
- The amount of memory and CPU being used for a database instance
- The amount of network traffic to and from a database instance
WARNING: Wait for the Status of the aurora DB instance to show as Available before continuing to the next task.
Congratulations! You have successfully reviewed the Amazon RDS DB instance metadata through the console.
Task 4: Test the application connectivity to the database
In this task, you identify the Application Load Balancer URL and run a basic HTTP request through the load balancer. You launch the web application installed on the EC2 instances and test the application connectivity to the database.
-
At the top of the console, in the search bar, search for and choose .
-
In the left navigation pane, choose Target Groups.
-
Select ALBTargetGroup.
-
In the Targets tab, wait until the instance status is displayed as healthy.
Learn more: Elastic Load Balancing periodically tests the ping path on your web server instance to determine health. A 200 HTTP response code indicates a healthy status, and any other response code indicates an unhealthy status. If an instance is unhealthy and continues in that state for a successive number of checks (unhealthy threshold), the load balancer removes it from service until it recovers. Fore more information, see Health checks for your target groups.
The Load balancers page is displayed.
- Copy the DNS name and paste the value in a new browser tab to invoke the load balancer.
Tip: To copy the DNS name, hover on it and select the copy icon.
Expected output: A web page like this is displayed.
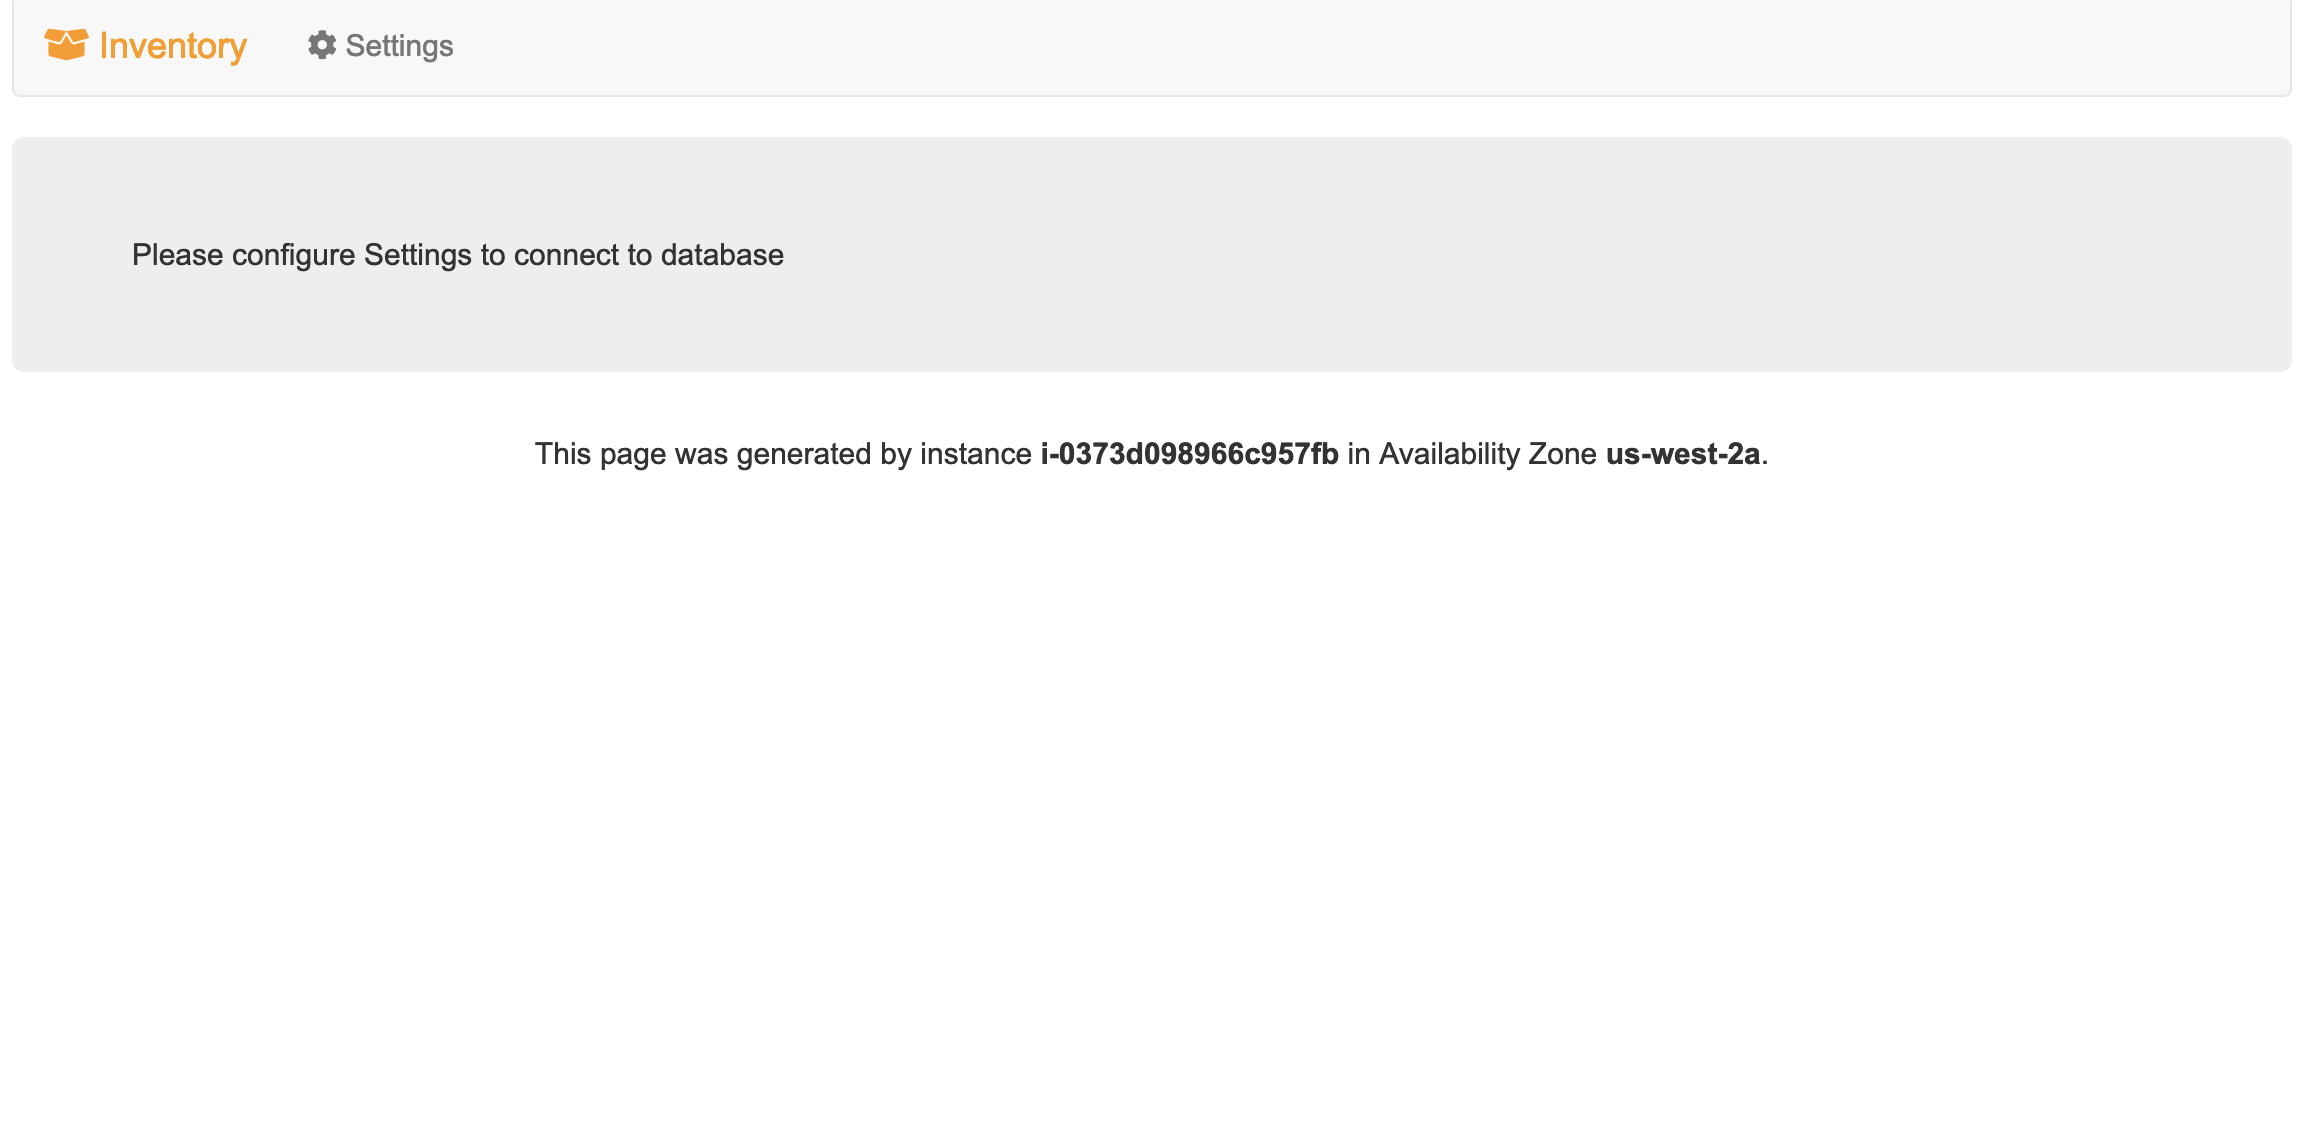
- Choose the Settings tab and then configure the following:
- Endpoint: Paste the writer instance endpoint you copied earlier.
- Database: Enter .
- Username: Enter .
- Password: Paste the LabPassword value from the left side of these lab instructions.
- Choose Save.
The application connects to the database, loads some initial data, and displays information. With this application, you can add, edit, or delete an item from a store’s inventory.
The inventory information is stored in the Amazon RDS MySQL-compatible database you created earlier in the lab. This means that if the web application server fails, the data won’t be lost. It also means that multiple application servers can access the same data.
Congratulations! You have successfully accessed the web application installed on the EC2 instance through the load balancer.
Optional Task: Creating an Amazon RDS read replica in a different AWS Region
In this challenge task, you create a cross-Region read replica from the source DB instance. You create a read replica in a different AWS Region to improve your disaster recovery capabilities, scale read operations into an AWS Region closer to your users, and to make it easier to migrate from a data center in one AWS Region to a data center in another AWS Region.
Note: This challenge task is optional and is provided in case you have lab time remaining. You can complete this task or skip to the end of the lab here.
-
Switch back to the browser tab open to the AWS Management Console.
-
At the top of the console, in the search bar, search for and choose .
-
In the left navigation pane, choose Databases.
-
Select aurora DB instance as the source for a read replica.
-
Choose Actions and select Create cross-Region read replica.
The Create cross region read replica page is displayed.
For Multi-AZ deployment: Select Don’t create an Aurora Replica.
The remaining settings in this section can be left at their default values.
- In the Connectivity section, configure the following:
- Destination Region: From the dropdown menu, select the region that matches the RemoteRegion value from the lab instructions.
- Virtual private cloud (VPC): LabVPC
- Public access: Select No.
- For Existing VPC security groups:
- To remove the default security group, select the X.
- From the dropdown menu, enter to choose this option. The remaining settings in this section can be left at their default values.
- In the Settings section, configure the following:
- DB instance identifier: Enter .
The remaining settings in this section can be left at their default values.
- Choose Create.
A Your Read Replica creation has been initiated. message is displayed on the screen.
-
To review the cross-Region read replica in the destination region, choose the hyperlink on the same page labeled here.
-
Otherwise, choose Close.
Congratulations! You have successfully completed the optional task and started the creation of a cross-Region read replica for the Amazon RDS database.